[bw_floater]
[bw_download title=”Download”]
[download id=”3″]
[download id=”4″]
[/bw_download]
[bw_paypal_donation amount=”10″]
[/bw_floater]
This cocos2d framework package is a wonderful framework for working with OpenGL ES within iOS. Since it focuses on high performance OpenGL ES code, for the most part cocos2d bypasses Apple’s Cocoa UIViewController hierarchy. This makes sense, since within iOS, OpenGL ES usually plays out on a single UIView, and typically in a single display orientation, so there’s usually not much to control.
However, there are occasions where the functionality provided by UIViewController can be quite useful. In particular, the following functionality is best handled by adding a UIViewController into the mix:
- Auto-rotation – in some games, or other OpenGL ES applications, it makes sense to change the orientation of the application display to match changes in the orientation of the physical device. This means that when the user flips the device from landscape to portrait mode, or back again, the application display will adjust itself accordingly. The auto-rotation works on cocos2d nodes directly and does not rotate the underlying iOS Cocoa
UIView. If you are interested in combining cocos2d nodes withUIViewsand having them auto-rotate together, please review cocos2d support for that here. - Device camera overlay – an increasingly popular use for iOS devices is to overlay a game or app view on top of the image visible through the device’s camera. This is known as augmented reality, and provides the user with a combined view of the real world overlaid with images generated by the application. For this use, a
UIViewControlleris mandatory, since it controls the merging of the real-world and generated image streams.
Here at The Brenwill Workshop, some of our iOS applications actually use both of these features, and we’ve developed a small framework that can easily add the capabilities above to any cocos2d application. This article describes the design and use of this framework.
Examples
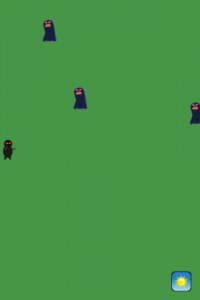
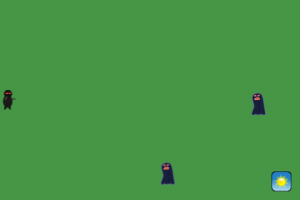
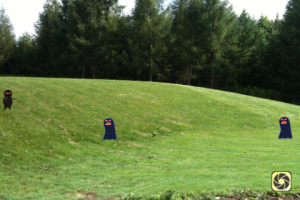
Since a picture is worth a thousand words, let’s start with sample screenshots from the example game, showing the automatic rotation of the game layer when the device orientation is changed, and the game layer overlaying the device camera image:


Although it is not shown here, the two features are compatible, of course, and the device camera overlay will also rotate along with changes in the device orientation.
Notice that, in the rotation from portrait to landscape orientation, the player image on the left has moved to the vertical center of the new orientation and the sunshine button in the lower right corner has stayed on-screen and in the same position relative to that corner. The game layer subclass is automatically notified of changes in the device orientation to give it a chance to adjust the positions of its child nodes to suit the new orientation.
Quick Start
This framework is centered on two classes: a node controller, CCNodeController, and a controlled layer, ControllableCCLayer. Setting up the controller is simple, and is handled in the applicationDidFinishLaunching: method of your UIApplicationDelegate implementation, during normal cocos2d startup. Add the following code at the end of this method (replacing the existing line: [[CCDirector sharedDirector] runWithScene: [[CCScene node] addChild: myLayer]];):
[objc]
GamePlayLayer* gamePlayLayer = [GamePlayLayer node];
controller = [[CCNodeController controller] retain];
controller.doesAutoRotate = YES;
controller.isOverlayingDeviceCamera = YES;
[controller runSceneOnNode: gamePlayLayer];
[/objc]
That’s it! You now have a cocos2d application that will rotate itself automatically as the device is rotated, and display itself over the camera view if the device has a camera.
In the first line of code above, GamePlayLayer is your subclass of ControllableCCLayer. In the second line, you create and retain the controller in a controller instance variable you add to your UIApplicationDelegate class (don’t forget to release it in the dealloc method).
In the third and forth lines you tell the controller to automatically rotate the game layers and overlay those layers on top of the device camera. No need to worry about whether the device actually has a camera. The isOverlayingDeviceCamera property can only be set to YES if the device has a camera, and it will be ignored otherwise.
In the last line, the controller sets the GamePlayLayer as its controlled node, wraps it in a CCScene, and tells CCDirector to run the scene. This last line replaces the typical [[CCDirector sharedDirector] runWithScene: [[CCScene node] addChild: myLayer]]; line normally found at the end of the applicationDidFinishLaunching: method within a cocos2d application.
CCNodeController, ControlledCCNodeProtocol, and ControllableCCLayer
Central to this framework is the CCNodeController class, which is a subclass of UIViewController and provides the bridge to iOS to receive automatic notifications of changes in the orientation of the device and to control the device camera display. When using this framework, you will need to instantiate a CCNodeController, but you will usually have no need to subclass CCNodeController, unless you have very specialized requirements.
As the name suggests, UIViewController is designed to control a UIView, also from Apple’s Cocoa UIKit framework. Although cocos2d does make use of a UIView under the covers and the CCNodeController does in fact control that UIView, practical OpenGL rendering is handled by the cocos2d CCNode hierarchy. Therefore, to make the controller useful to cocos2d, we need a bridge between the controller and the CCNode hierarchy.
Enter the ControlledCCNodeProtocol protocol, which defines the requirements that a CCNode must support for it to be controlled by a CCNodeController. These requirements are actually relatively simple, amounting to tracking the controller itself via a controller property, and handling notification of changes in the device orientation through a deviceOrientationDidChange: method.
In Apple’s UIKit framework, although a UIViewController can control any UIView subclass, in practice controllers are almost always applied to control the top-most UIView within a window scene. Similarly, although a CCNodeController can control any CCNode subclass that supports ControlledCCNodeProtocol, in practice it is the main CCLayer at the level of the scene that is of most interest.
In recognition of this, the framework here includes a ControllableCCLayer class that adds the behaviour defined by ControlledCCNodeProtocol to CCLayer. This class is subclassed from CCColorLayer and supports initialization either with or without a background color. In your application, you derive subclasses of ControllableCCLayer instead of CCLayer, to allow your layers to rotate automatically and overlay the device camera.
ControllableCCLayer automatically resizes as it rotates, and there are hooks for the subclasses to latch onto to reposition child nodes if needed. It is also smart enough to know that if it has been configured with a colored background, it should not draw it when overlaying the device camera, but should present a transparent background instead.
Typically, your cocos2d application will have a number of scenes, each with a primary layer. Since cocos2d reuses a single UIView instance on which to draw scenes, you will need only a single CCNodeController instance. But as the layers are swapped in and out during game play by the CCDirector, the CCNodeController must be kept in sync so that it knows which layer is currently active. You can use the controlledNode property on the CCNodeController to set the active layer. Or, to make this synchronization task easier, your application can use runSceneOnNode:, a convenience method on CCNodeController, to start or swap out a layer in both the CCDirector and the CCNodeController simultaneously with a single call.
Auto-rotation on Device Orientation Changes
The doesAutoRotate property of the CCNodeController enables and disables automatic rotation of the controlled node. When this property is set to YES, the controller will start to listen for notifications of device orientation change from iOS and propagate those notifications to the cocos2d framework as they arrive. When this property is set to NO, the controller will stop listening for iOS notifications. To automatically rotate a ControllableCCLayer in your application, all you need to do is set this property to YES, and attach the layer to the controller, typically using the controller’s runSceneOnNode: method, as described in the previous section.
With the doesAutoRotate property active, when the CCNodeController is notified by iOS that the device orientation has changed, it informs the cocos2d framework of the change, and also calls the deviceOrientationDidChange: method on the controlled node.
ControllableCCLayer is the most commonly used controlled node class. In most cocos2d applications, layers cover most or all of the device screen and, when the device orientation changes, the contentSize of the layer should generally change to match the new orientation. The ControllableCCLayer property alignContentSizeWithDeviceOrientation controls whether the layer will automatically adjust its contentSize to align with the new orientation. In particular, if this property is set to YES, and the device orientation changes from portrait to landscape or vice versa, the contentSize of the layer will automatically change to its transpose. When changing between two landscape orientations (landscape-right or landscape-left) or two portrait orientations (normal or upside down), the contentSize will remain unchanged. This property is initially set to YES. However, if your application has a layer subclass that is smaller than full screen, you might find occasion to set this property to NO so that the contentSize (and shape aspect) will remain steady through rotations between portrait and landscape orientations.
To provide a hook for subclasses of the ControllableCCLayer to know when the contentSize has changed, the ControllableCCLayer method didUpdateContentSizeFrom: is called automatically whenever the contentSize of the layer changes. Your subclass can override this method to adjust the positions of any child nodes after a rotation. For example, to keep a button or label in, say, the center or the bottom-right corner of the layer after a change in the contentSize of the layer, the subclass can update the position of the button or label accordingly in didUpdateContentSizeFrom:.
Finally, note that the auto-rotation works on cocos2d nodes directly and does not rotate the underlying iOS Cocoa UIView. If you are interested in combining cocos2d nodes with UIViews and having them auto-rotate together, please review cocos2d support for that here.
Overlay the Device Camera View
The CCNodeController property isOverlayingDeviceCamera controls whether the controlled node will be displayed over the view of the device camera. Your application only need only toggle this value to cause the overlaying effect to be applied or removed. The CCNodeController takes care of coordinating all the activities needed to make it happen. This property cannot be set to YES if the device does not actually have a camera. Attempting to do so is safe, because the action is simply ignored and the controlled node will continue to behave as it does when not overlaying the device camera. To find out if this property can successfully be set, you can check the isDeviceCameraAvailable property of CCNodeController, or you can simply set the isOverlayingDeviceCamera property and then check its value to see if the change was successful. The value of the isOverlayingDeviceCamera property can be changed at any time, and it is up to your application to determine when, if ever, that should happen. For instance, you might change it upon a scene transition, or even during active game play via a user-controlled on-screen button.
Within iOS, applying or removing an overlay on the device camera is not a trivial activity. Although your application interacts only with the isOverlayingDeviceCamera property, a lot happens under the covers. One important aspect is that in order to display an overlay on the camera image, a second specialized UIViewController (UIImagePickerController) is created and displayed modally. This does not specifically affect the use of cocos2d, but may impact applications that combine cocos2d visual components with standard UIKit views and controls. It also impacts the visual flow of your game, since going from not overlaying to overlaying can take a few seconds and involves a mandatory display of a camera iris image by iOS.
Another important aspect of swapping the device camera overlay in and out is that the running scene must be stopped and restarted on each change between overlaying and not overlaying or back again. This is needed to ensure that active actions and touch events are cleaned up correctly between transitions. For the most part, this effect is typically transparent to the application. As part of the stopping and restarting of the scene, the onExit and onEnter methods on the controlled node are called just before and just after the switchover, respectively. Your controlled node can make use of these calls as hooks to know when the switchover occurs in order to update state accordingly. Typically this might include hiding some visual items and showing others. For example, when the device camera image is visible, you might hide a background image or skybox and show some camera controls.
Fantastic! Where Can I Get Me Some of That?
You can download the source code for this framework in the download area at the top-right of this article. It is distributed under an MIT license, which makes it free for you to use in your projects. However, if you find this code is useful, please remember to make a donation above to help us fund the ongoing development and support of frameworks such as this.
Once downloaded, unzip the file, and drag the extracted directory to your Classes group within your Xcode project. On the dialog that pops up when you do that, make sure both the Copy items into destination group’s folder and Recursively create groups for any added folders options are both selected.
You can also download a full Xcode project of a simple example game that demonstrates the use of node controllers for both auto-rotation and device camera overlay. Simply unzip the downloaded file to extract the full project directory. The game is based on an example developed by Ray Wenderlich and published by him as a tutorial. Our version also makes use of a framework of cocos2d UI Controls that we developed, and which also may be of interest to you for your cocos2d projects.
Comments
16 responses to “cocos2d and UIViewControllers”
[…] Update: Bill Hollings wrote an interesting article regarding autorotation where he describes another approach. Includes sample code: cocos2d an UIViewControllers […]
This looks interesting as I’ve been playing with auto-rotation on the iPad.
You mentioned in the comments in the linked article (Autorotation in v0.99.5) that this fromework “- does NOT support UIView rotations … so UIKit overlays are not auto-rotated”. It may be worth mentioning this here, since that is what I was hoping for, i.e. being able to add, say, a UITable to a cocos2d layer and have it all auto-rotate.
Thanks for the postings.
Cheers
@Rob
Thanks for pointing that out. I can see how it might be confusing. I’ve updated this article to clarify that point.
…Bill
Hi Bill,
I want to do something similar to the camera overlay, but rather than overlaying the camera, I was hoping to overlay a movieplayer view… does that seem reasonable, or is that not going to work?
Thanks,
Paul
Hi Paul…
Sorry for the delay. I was out and about over the long weekend.
I don’t think this framework is going to help you overlay video file playback. The camera picker controller is generally for recording only, not playback.
However…you may be able to combine cocos2d with the standard movie playing UIViews. There are a few articles in the cocos2d forum that discuss combining cocos2d with UIViews. Also…riq has written about the subject a bit here and Frogblast here.
Sorry I couldn’t be more help.
Good luck…
…Bill
Hi Bill,
This is a great tutorial! I was wondering if you were planning on updating it to coincide with the latest developments of Cocos2D? The auto-rotation is no longer an issue, and now there is a UIViewController (RootViewController).
Thanks!
Nick
Thanks, Nick.
This framework is still used by cocos3d. In a future release of cocos3d, we’ll update it to make use of something along the lines of cocos2d’s
RootController.…Bill
Hi, I’m new to cocos3d and cocos2d, and my question is if there is a way to get the camera input image by image, because I need to perform face recognition and not just show it in the background of the object. Thanks!
Hi Dragon…
I’m not sure. We haven’t looked at it from that perspective, so I can’t give you much advice on that.
…Bill
Please refer to Apple’s CIdetector example app “square cam” app…it has everything you need.
Hey Bill,
amazing tut. Your link for full Xcode project of a simple ‘example game’ that demonstrates the use of node controllers for both auto-rotation and device camera overlay does not work. Please look into it.
You’re doing great.
Thanks.
Hi 89Hardy…
As far as I can tell, the link above is working, and the downloaded package compiles.
…Bill
[…] cocos2d and UIViewControllers « The Brenwill Workshop As the name suggests, UIViewController is designed to control a UIView , also from Apple’s Cocoa UIKit framework. […]
This app compiles fine on my system (using Xcode 4.3.1 with latest cocos2d and 3d, iOS 5.1 and mac os 10.7.3). You will need to change your c/c++ compiler settings from GCC 4.2 to Apple LLVM compiler 3.1 (located under build options).
Hi Bill
I am trying to load current CC3Scene in my game….unfortunately nothing is working for me.
Hi Apurv…
This is a very old article.
The
CC3DemoMultiScenedemo app in latest Cocos3D distribution demonstrates how to integrate a Cocos3D application withUIKitandStoryboards.Please as further questions in the Cocos3D forum.
…Bill